 Eating My Way Around South America
WHAT TO EAT: El Chivito sandwich
WHERE TO EAT IT: Uruguay; In Montevideo Marco’s in Pocitios neighborhood or El Tinkal (Dr. Emilio Frugoni 853)
Sandwiches. If there is such a thing as a universal food, it’s the sandwich. From bahn mi to panini to po’ boys to croque monsieur. The list is endless and it seems every country offers up their own beloved version. Sandwiches are one of the most perfect foods due to their portability, accessibility and flexibility and they speak to everyone from children to the elderly, crossing every economic border. The sandwich is something all can relate to, no matter where you grew up, what language you speak or how much money you have. I do believe, sandwiches can save the world!
Everyone likes some kind of sandwich. The concept is one of the most basic although some would argue that a sandwich could hardly even be considered something of a cuisine. I mean, after all, isn’t a sandwich just two slices of bread, stuffed with whatever you want? Putting the thing into a panini press hardly constitutes cooking. True, but the execution of the humble sandwich is what can propel it from school lunches to gourmet status in a heartbeat.

sandwiches make the world go round
If I think back in my sandwich-eating history (we all have one don’t we?) it started, like many I’m sure, when I was a child. I was such a finicky eater back then, my poor mother would practically pull out her hair in search of something that I would actually eat on a regular basis. If only she could see me now, trying innards, ants and tongues, she would surely shake her head in disbelief. Most days she had to resort to standing at the stove making one of the few things I would actually eat the entire thing of, a grilled cheese sandwich. If someone had showed her the future me with a matured, grown-up palate, she would have assuredly stated “no way, not my child”.
But despite my evolved eating habits, the grilled cheese sandwich not only evokes images from my childhood, of being a small child patiently (hey, this is my memory here!) waiting for the sandwich to be ready (I swear I never uttered the words “is it ready yet?”) but also still remains one of my favorite foods to this day. These days I’ve had my share of gourmet versions made with cave-aged gruyere, stuffed with arugula on artisanal breads but I would still fully embrace a grilled cheese from my youth, one made with processed food criminal, Velveeta (I know, I know…) on Wonder white bread (another justifiably vile food of this day and age), just like ma & my brother used to make for me.
One can argue that the sandwich can even partly define a country. One look into the croque monsieur will tell you that France does not fuck around when it comes to food. Melted gruyere and ham on high-quality, crusty French bread covered with a bechamel sauce. Take that, you humble sandwich you! The bahn mi nods to French colonialism in Vietnam (bahn mi actually means bread and is a Vietnamese copy of a French baguette) mixed with modern-day Vietnamese ingredients like daikon and pork sausage. The submarine sandwich of the United States reflects the diversity found in this country. All over the US, it’s referred to by it’s different names: sub, hoagie, hero, wedge or grinder, depending upon what part of the states you are visiting. Indeed, a peek inside a sandwich reveals a lot.
Which takes me to the basis of this post. The chivito. This is Uruguay’s star sandwich and perhaps one of the only defining foods for the country. When one thinks of Uruguayan cuisine, an inevitable blank draws. Steak? Wine? Maté? Argentinian people will be the first to tell you that Uruguay is simply copying their foods. I disagree with that but it’s true, I am hard-pressed to define Uruguayan cuisine. I interviewed chef Ignacio Mattos , of highly acclaimed NYC restaurant, Estela, who was born in Uruguay. When I asked him what he thought of his country’s cuisine, he told me point-blank that there was no such thing. Let’s take a closer look at this largely unknown country.

many people don’t even know where Uruguay is
Uruguay is a wonderful country, full of friendly people and beautiful landscapes. Almost 90% of the population is of European descent. Spanish, Portugese, Italian, British and even the French. Naturally, this reflects in everything. The architecture looks European, the foods are European influenced and the people look European. Hybrids of Italian-Spanish and Portuguese-Spanish are spoken.

walking along the seaside in the capital, Montevideo
Uruguay is also one of the most tolerant nations in the world. With the exception of Brazil, the majority of Latin America is not a gay friendly destination. On the whole, South America is pretty narrow minded when it comes to that sort of stuff. Uruguay was the first country in S. America to legalize same-sex civil union and allow for gay adoption. It was the first country in the Americas to test for hemp cultivation. Uruguay has no official organised religion and church and state are separate. Politicians deem it the most secular nation in the Americas.
When it comes to food, Uruguay, on the surface, tends to mirror Argentina with the wines, meat, Italian-influenced and maté everywhere. But on closer inspection, almost all of Uruguay’s meat is grass-fed to this day, whereas Argentina (more and more) are mass-producing beef that is fed grain or a mixture of grass/grain. Wines are different here too. You won’t find so much Malbec but instead the lovely Tannat grape. And Argentina cannot even compete with the amount of maté consumed in Uruguay. In Argentina it’s more of a social thing, although you do see people carrying their thermos to and from work. In Uruguay, everyone carries their own thermos, gourd and bombilla.

Tannat was a new wine for us and one we quickly adored
But perhaps the one food that really sets Uruguay apart from everywhere, including their neighbor, is the chivito. I feel like when celebrity chef Anthony Bourdain visited the country, he put it best:
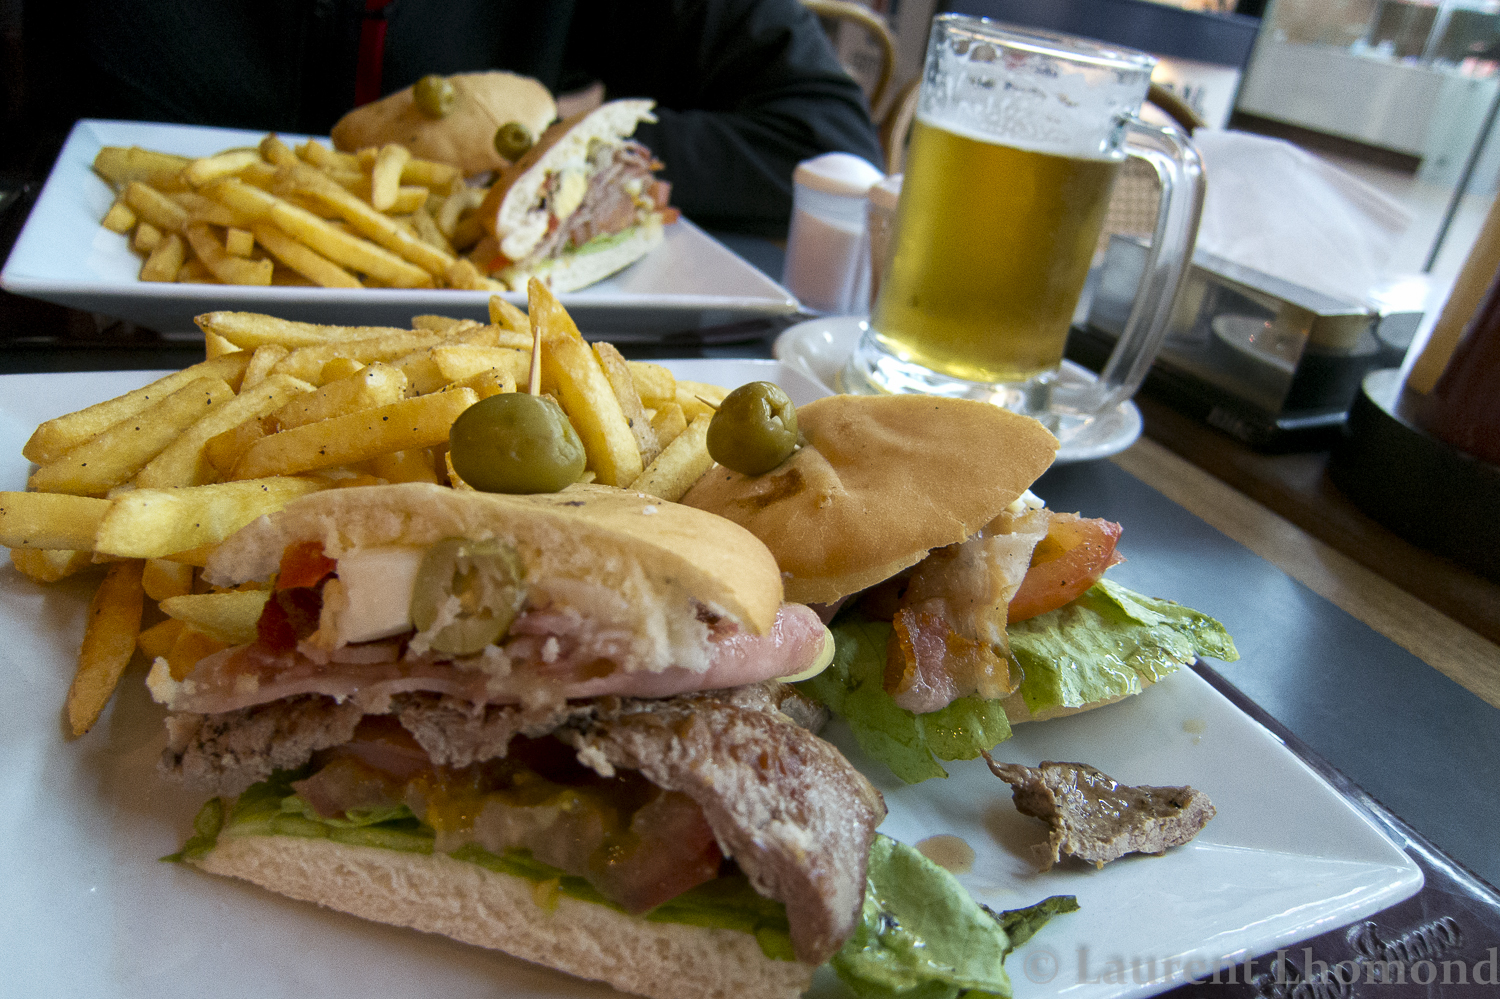
“The first thing I need to talk about is the chivito, because it’s the best sandwich I’ve tasted in my life, including the venerated & thousand times described pastrami sandwich of New York and the mortadella and cheese sandwich from the market of Sao Paulo, Brazil. Really, the chivito is too good to be true; it’s almost impossible to eat because of how tall it is. Moreover, the idea of putting together beef, bacon, ham and cheese in the same bite, without counting all the other things it contains, is incredible. What’s more, in the US you could be arrested for daring to eat something like this. For me, any country that embraces this as its national sandwich is great!”
My first experience with Uruguayan food was actually in New York. There is a lovely little restaurant called Tabaré in East Williamsburg, Brooklyn. It was here that I had a chance to sample the chivito. It was also my first (of what was to become many) sip of the robust Tannat wine. If you live in New York and are curious to Uruguayan food, I can’t recommend this place enough. Do you have any Uruguayan restaurants in your city? If so, please let me know where in the comments section below.
So what exactly is in this sandwich that makes it so special? How did it come to be? It started back in the 1940’s, at a restaurant (sadly, not in existence anymore) called El Mejillón in Punte del Este. An Argentine woman, who was vacationing there, asked the chef to make her a sandwich using chivito (baby goat). The chef had no goat on hand and so he improvised. Instead, he used thinly sliced beef filet, topped with a piece of ham between a crusty roll. The rest, as they say, is history. El Chivito is a carnivore’s delight, a monster of a sandwich, and practically a heart attack on a platter, but it’s mouth-wateringly delicious.
Throw your diet aside for the day and dig into one of the best sandwiches in the world.
Things You Will Need:

-Ciabatta bread (or bun or other crisp on outside, soft on inside bread)
-Grass Fed Beef steaks (any kind will work) pounded very thin and salted
-Slices of ham (you don’t want it too thick or too thin)
-Pancetta or canadian bacon (sliced) or bacon slices
-Mozzarella cheese
-Onions and Peppers (thinly sliced and pan fried in olive oil until tender)
-Tomato
-Lettuce
-Green olives chopped
-Fried or hard boiled egg
-Salsa golf (mayo and ketchup mixed together)
*Things like the lettuce, tomato, onions, peppers and salsa golf are optional and not always included on the chivito. The best chivitos, in my opinion, do include all these things. If you hate olives, just skip it. If you want to use another cheese, go for it. The traditional chivito contains the things I have listed but are free to be changed, based on your own preference.
How To Prepare:

Heat your oven to broil
In a skillet, cook the pancetta or bacon first over medium high heat. Whether using pancetta or regular bacon slices, brown it until crisp. Remove from pan.
Place your pounded grass fed beef steak in the bacon fat and cook quickly on both sides (you don’t want to make the meat tough). Tip: Pretty much anything cooked in bacon fat automatically makes it better.
Remove the beef and quickly sear the ham in the pan. Place cooked ham on top of beef and add mozzarella cheese.
Fry your egg according to how you like it. We like ours still a bit runny. Set egg aside. If you prefer hard boiled, have it chopped and ready to be assembled.
Add mozzarella cheese to the beef, bacon and ham. Put it under the broiler for about 2 minutes or until cheese melts.
To assemble the sandwich. Toast the bread if you like. Roasted peppers and lettuce get laid on the bottom half of the bun, followed by the meat (beef, bacon and ham) with the melted cheese on top. Slices of tomato, the chopped green olives and a fried egg or sliced hard-boiled egg are next.
The top half of the bun is ready to cover it but first, a nice smattering of the salsa golf, if you like, is added.
This is no dainty finger sandwich, so grab a side of fries, an ice cold beer, a fork and knife and dig in!

WHAT TO EAT: Locos
WHERE TO EAT IT: In Chile but Valparaiso has the best version I’ve tasted
I guess you could say that I’m loco for locos! Crazy for crazy?!Coco for Cocoa Puffs? Huh? What does that even mean? Have I lost my mind? Well, no not yet. I’m talking about locos, a type of shellfish that you can find in Chile. One of my favorite things about Chilean food is the fresh seafood. While the coast is not as bountiful as Peru (the Humboldt current doesn’t stretch that far south), Chile has its fair share of fresh fish and shellfish. Most often it’s prepared the typical Chilean way (read: lots of mayo and avocado-Chileans add those two things to seemingly everything!) but if you are lucky, you can find the seafood prepared just as it was meant to be tasted. Minimal is the way to go to let the flavor of the fresh fish shine. One food we encountered that I had never had prior to my trip in Chile is locos. Did locos go crazy to get their name?
After some brief investigation, it turns out that locos aren’t crazy at all. They are abalone. Well, sort of. Abalone is the name given to any large edible sea snail and locos indeed fall into this category. Locos are more properly known as concholepas concholepas (pretty redundant if you ask me but hey, I can’t even make this stuff up!). Even though abalone and locos are both gastropods, the locos are carnivores which means they lend a more tender texture. You can google abalone to find out more about their whorls & apertures (admittedly fascinating stuff) but I’m not going to get too deep into that here.

the meat of abalone compared with the size of a quarter for perspective
I do, however, want to briefly touch upon the controversy surrounding locos. The concholepas concholepas are a highly sought after product by Chilean fisherman. I remember when Laurent and I were visiting the seemingly idyllic, peaceful island of Chiloe in southern Chile, kayaking by dawn, when a war broke out. Yes, you read that right a war! A war over locos. There were guns involved and it did not sound very pretty. During the 70s, there have been various locos wars due to an increased demand. Overfishing is a serious problem that Chile has to deal with, not just with locos but also with salmon and Patagonian toothfish, among others.

concholepas concholepas
There are also many farm fisheries in the country, especially around the Puerto Montt area. In fact, Chile is one of the largest exporters of salmon in the world. When you think of Chilean fish, many of you will automatically think of ‘Chilean sea bass‘, however, they never eat this fish in Chile (unless you are down in Patagonia catching it fresh, & there it is referred to by its real name-Patagonian toothfish).
Chilean sea bass is actually a name that is used to market the Patagonian toothfish to North American restaurants. Most people in fine restaurants do not want to eat something called toothfish. So they coined the Chilean sea bass name. Sounds more elegant, I suppose but it’s not even a bass! This fish is one of the most endangered in the world, so avoid it. Even though this article is a bit dated, it still deals with the same problems faced in Chile today: read more here.
Due to the heavily decreased populations of locos, it is now strictly controlled and forbidden to fish at certain times of the year in specific regions throughout the country. Currently the only legal way for Chilean fishermen to catch locos is to have a Marine Area of Benthonic Resources Extraction permit and the minimum size for extraction is limited to 10 cm. This makes them currently somewhat sustainable (and I use that word extremely loosely here) but illegal fishing is all too common. I wouldn’t make locos part of my everyday diet but I would recommend trying them at least once in your life. They are absolutely delicious and one bite will make you understand why they are a considered a ‘delicacy food’.
The most common way to find locos prepared in Chile is in the dish known as ‘locos con mayo’. It’s pretty much exactly what the name implies: the locos prepared with, you guessed it, mayonnaise. I really don’t understand why Chile seems to have an obsessive, not to mention unhealthy, relationship with this particular condiment and if you live or have ever visited the country, I’m sure you noticed the widespread, and mostly unwelcome, addition to many a dish. Sorry Chile but I just don’t share your inexplicable love and excessive use of mayo.

locos con mayo
If you are eager and curious to try locos, I would have to urge you to just say no when it comes to locos con mayo. Instead try to seek out a more natural preparation which allows the tender, mild flavor of the locos to shine. I set about to try and find exactly this and lo and behold, I struck gold in Valparaiso.

restaurant Espiritu Santos in Valparaiso, Chile
Valparaiso is a small city that sits about 3 hours west of Santiago, directly on the western coast of Chile. It’s a colorful, hilly, bohemian city (some refer to it as Chile’s San Francisco-a bit of a stretch there but it’s a charming place all the same). There are some really good eats in Valparaiso. I might even go so far to say that one of the country’s best restaurants can be found here. Espiritu Santos had the preparation of locos I had been dreaming of. A touch of creme fraiche in a butter-lemon sauce, wafer-thin radishes, sun-dried tomatoes, capers & parsley. The most simplest of ingredients perfectly in place to highlight the flavor & texture of the locos.

a sublime preparation of locos from Espiritu Santos
And for the uninitiated, what do locos taste like? They have a delicate, mild flavor very similar to calamari and maybe even a scallop but not as sweet. When preparing locos it is vital to tenderize the meat by pounding it first and fortunately for our tastebuds, the chef at Espiritu Santos prepared the dish to perfection. The meat was tender and melted in your mouth along with the taste of butter, cream and lemon. The crunch of the radish, the taste of salt from the caper, sweetness from the sundried tomato were all tied together through the herbal notes of the parsley making the locos sing in your mouth. Do not hesitate. If you are in Valparaiso and want to try locos go to Espiritu Santos located at Hector Calvo 392, Valparaiso, Chile.
I thought about posting a recipe for locos but I think that they are hard for people to find, most likely due to their seasonal nature and sustainability issues. You can buy locos online here but best to just plan a trip to Chile, make a stop in Valparaiso, one of my top 10 unmissable destinations in Chile and taste them fresh from the source.

WHAT TO EAT: Arroz con coco
WHERE TO EAT IT: All along the Caribbean coast in Colombia. I’ve spied it in Brazil too but to a much lesser extent
I like rice. No, let’s correct that. I LOVE rice! It’s been a staple food for me since I was a kid. Back then, I was the pickiest eater going. I gave my mom quite a bit of trouble with my choosy eating ways and if she could see me now eating ants (!!) and innards, she would surely shake her head in disbelief! One food that can always satisfy me, as the fussy kid or the adult that tries anything once, is rice. These humble grains are consumed around the world in one form or another with some cultures subsisting primarily on the starch.
In my world, rice needs little to no adornment. A pinch of salt and pat of butter make those grains sing in my mouth. But I won’t deny the allure of a fragrant pilaf, creamy risotto, a rich, savory paella or even a forkful of the fried rice I like to eat straight out of the white take-out Chinese cartons. When we arrived to the Caribbean coast in Colombia, I discovered a preparation of my beloved rice that was completely new to me and all at once, deliciously addictive! And now I want to share it with you.
Arroz con coco (or coconut rice) is typically eaten alongside fresh fish, another staple of the northern coast of the country. The slightly sweet rice perfectly complements the savory fried fish. If you are a lover of things salty and sweet together like I am, then you have got to try this dish! Or maybe you are bored making the same old rice dishes, then this recipe is sure going to jazz up your rice!

arroz con coco served with fried fish
Rice has gotten a bad rep lately. Especially white rice. Anything white and starchy is seen as a bit of a devil to the health conscious. And it’s true, brown rice is healthier. I am not going to lie about it. For white rice, they remove the hull and with it, many nutrients. That being said, you can certainly use brown rice in this recipe. While I am not at all opposed to the lovely brown rice and I enjoy its nutty flavor in a variety of dishes, it’s not traditional in arroz con coco and I honestly feel the results work better with white rice. But if you are one that views white rice as the antichrist, then by all means substitute the brown one. And if you don’t eat rice at all, for health reasons or any other, well, I feel sorry for you! But that means more rice for the rest of us!
But coconut! Ah, that is a different story. Coconut has become the poster child for health-loving, fit people. Once feared as a culprit of saturated fat, coconut is currently experiencing its much-deserved heyday across North America and Europe. Countries in Southeast Asia and other parts of the world have been reaping the health benefits of this ubiquitous fruit for years. In South America, especially in Brazil and Colombia, coconut is prepared in a variety of ways and are part of the staple foods.

coconut water sold on the streets in Cartagena, Colombia
What makes coconut so healthy? For starters, it’s an excellent source of vitamins and minerals including an abundance of manganese. It also contains a good amount of potassium, iron and phosphorous. The coconut water is identical to human blood plasma (in Ph) and this is why it’s the most perfect post-workout hydration. It’s like gatorade but natural (and tastes so much better!) It replaces electrolytes with its high levels of potassium, sodium and chloride. It’s naturally very low in both sugar and calories. Coconut is also rich in lauric acid which is a natural antifungal, antibacterial and is difficult to find in other foods. It’s this lauric acid that really sets the coconut apart from other foods. You can only find it in coconut, palm kernel oil and human breast milk.

Coconut oil, once criticized for its saturated fat (which it does indeed contain a large amount of) is now considered to be one of the healthiest fats to consume. In fact, coconut oil is one of the richest sources of saturated fats known to man. Contrary to older wisdom, saturated fats are not the culprit in clogging your arteries resulting in strokes and heart attacks. Also, the saturated fats in coconut oil are medium chain triglycerides. What does this mean for your health? That they can actually have a reverse effect and instead of clogging arteries, they help to clear them. These fats are easily metabolized and are thought to help with a variety of conditions. They are even sold as health supplements! Click here to read more about these unique fats that are only found in coconut oil or palm kernel oil.

I’ve really only scratched the surface, as there are much more health benefits to consuming coconut. Best of all for the cook and the eater, it is versatile and delicious! My first encounter was practically off the plane in Cartagena, Colombia. On almost every street corner, vendors sell coconut in one form or another. Plates of coconut meat are stacked high and the best vendors sell the whole fruit by simply making a small hole and inserting a straw so that you can quench your thirst with the ultimate quencher, coconut water. Not the kind in tetra packs in Whole Foods, no sir. This is straight from the source. And if you happen to be beachside in the Carribean part of Colombia, get yourself a coco loco! No trip to the beach is complete without indulging in this tropical tipple.

Laurent & I happily sucking down some coco locos
My first taste of arroz con coco came shortly after, when we made our way to the San Bernardo Islands. This chain of islands is part of a larger National Park (Rosario) and is easily reached from the town of Tolu. The islands are pretty far removed from the mainland and so all the food needs to be either grown, caught or transported in. The people living on the island don’t have much but they have a surplus of two things. Fish and coconut. The most commonly prepared dish is ‘pargo de rojo con arroz de coco y patacones’ (red snapper with coconut rice and fried, smashed plantains). Yum, I can still taste it thinking of it now!

coconut filled palm trees line the San Bernardo Islands
Even though the arroz con coco pairs nicely with fish, it certainly isn’t limited to that protein. You can eat it with lentils, beans, chicken and even beef. It’s so good, it can even stand on its own! There are a few ways to make it, some more laborious than others. I’ve seen a few recipes that suggest merely cooking rice in coconut milk. While this may seem like an easy way out, don’t do it. The results are just not very authentic if you are after a true Colombian arroz con coco and authenticity aside, it’s simply not as flavorful this way.
While this recipe does indeed use coconut milk, it calls for the milk to be reduced until it forms a caramelized paste called a titoté in Colombia. It takes some time for the milk to reduce but don’t skip this step! When you caramelize anything, you are giving it great flavor. If you skip over it, or rush it-you are going to lose the flavor. Flavor is key to cooking!
Things You Will Need:
-Coconut Milk (fresh is desirable but I understand that it’s laborious, so feel free to use canned)
-Rice-I really recommend using long grain white rice here but if you must use brown, increase the water to 2.5 cups and the cooking time to 45-55 minutes
-Sugar in the Raw or other Brown Sugar (or Panela if you can get your hands on it!)
-Pinch of Salt
-Water
-Organic Extra Virgin Coconut Oil-for finishing (optional)
Now lets have a little chat about the amounts. If this is for a side dish to a protein serving 4-5 people (fish, chicken, lentils or other legumes) use the ratio of 1 cup of rice to 2 cups of coconut milk and 2 cups of water (yes, I realize that that is 4 cups of liquid to a mere 1 cup of rice but I’ll explain). For these measurements, 2 tbps of sugar, 1 teaspoon of salt and 2 tbsp of coconut oil also work.
If you want to enjoy just the coconut rice on its own or if you are cooking for a crowd, increase the amounts to 4 cups of coconut milk, 2 cups of rice, 4 cups of water and 4 tbps of sugar and 2 tsp of salt.
The reason that you need 4 cups total of liquid (2 cups coconut milk and 2 cups of water) is because you are going to reduce the coconut milk to nothing but toasted flavor. The water is the only liquid that you will cook the rice in.
The coconut oil is completely optional but be sure to add it at the end after it has cooled a bit. This is to ensure that you don’t lose any of the health benefits of the raw, virgin coconut oil (when you heat it if it’s raw oil, you instantly lose the health properties). Just add about 2 tbsp and fluff it with a fork. I love the texture it adds not to mention all the health benefits.
How to Prepare:
Don’t be put off by the reduction of the coconut milk! It’s truly easy and perhaps it takes some time and is not ideal for a worknight meal but it adds sooo much flavor that you will be justly rewarded, I promise! After the coconut milk reduces, it proceeds just like regular rice so you can go and do something else while the rice does its thing.
First you need to get a medium sized saucepan (the one you usually make rice in-preferably one with a heavy bottom and a tight fitting lid). Pour the coconut milk in all at once and turn on the heat to medium-high. Let it sit until the coconut milk starts to boil. Boil the milk for 35-45 minutes or until it reduces to form a paste that resembles oatmeal on the bottom. You don’t need to stir it a lot while it boils but take care it doesn’t boil over but also don’t lower the heat too much so that it doesn’t boil at all! Stir only once every so often.
After it reaches the paste-like consistency, you are going to have to be a bit more active at the stove. Now is the time to stir often until the water from the coconut milk completely evaporates from the paste. The oil in the coconut milk will begin to separate and the whole thing is going to start turning golden brown. This is what you want! Stir often to prevent it from burning and feel free to lower the heat a bit if you see it starting to burn.

Look at the rice in the photo. See that nice, golden Brown color? That is the color you want the caramelized coconut milk to turn.
Once all the water is evaporated and it has turned a nice golden brown color (called the titoté), add in the sugar and the salt. Stir to mix. Next, add the rice and stir to coat the rice evenly. Pour the water in, stir once, raise the heat to medium-high again and bring to a boil uncovered.
Once it boils, put the lid on right away and lower the heat to the lowest setting. Cook for 12 minutes on low heat. After that time, shut the heat off and let it sit undisturbed for 15-20 minutes. Open the lid and let it cool, unstirred for 5-10 minutes. Add coconut oil if using and fluff with a fork. Serve on its own or as a side.

arroz con coco makes an ideal side dish
This dish is naturally vegan, vegetarian and gluten-free. For a complete meal, serve with a protein like lentils or black beans.
Warning: This dish is massively addicting!!

WHAT TO EAT: Arepa con huevo
WHERE TO EAT IT: Colombia. You can find it in cities like Cali or Bogota but the best and the original is all along the Caribbean coastline.
I just realized that I have yet to present one of my favorite South American countries through food, Colombia. Both Laurent and I fell in love with this country. The landscape is varied and beautiful ranging from the coastal Caribbean with its crystal blue warm waters in the north to the lush, green mountain interior and the Amazon jungle to the south. Every part of Colombia we traveled was full of friendly, welcoming people who were eager to share their beautiful cultures and traditions with us and of course, their food.

the beautiful Caribbean coast of Colombia
The foods of Colombia changed just as much as the landscape did, each dish representing a different side to this endlessly fascinating country. I can’t wait to share with you all the different foods I discovered here but for now, I am just going to focus on one of my favorites that we found everywhere in the north all along the Caribbean coast, the humble arepa con huevo.

The first time I tried this, Laurent and I were on the Caribbean coast in the San Bernardo islands. We decided to camp and a lovely woman named Lena allowed us to pitch our tent on her gorgeous waterfront property. Our backyard was coconut trees and directly in front of our tent we had jaw-dropping views of the Caribbean Sea. Now that’s what I call a room with a view! Meals were included and were simple yet delicious dishes. For breakfast every morning, Lena cooked us up two arepas con huevo. Served with a simple cup of tinto (Colombia’s sweetened coffee), it made a perfect start to our day.

our room with a view!
Both Colombia and Venezuela can lay claim to fame for creating this quintessential street snack, the arepa. What the pupusa is to El Salvador, a gordita for Mexico or the sandwich to the United States, so is an arepa for these countries. In Colombia the arepa runs deep, going back centuries as a food consumed by the indigenous people which was later passed on to the farmers. Today it is the premier street food in the country with countless regional variations existing from north to south. And while it’s not the healthiest food, being deep-fried, it is suitable for those with gluten intolerance.
Just like in Venezuela, particular styles, fillings and even the dough can be different depending upon where you are. By far, the most common arepa is the simple grilled variety found on almost every street corner throughout the country. Often a thick cake grilled directly on the street over charcoals and slathered with butter, sometimes stuffed with cheese, it is a completely irresistible snack. If that smell of corn grilling over an open fire doesn’t grip you and make you stop in your tracks, then I’m not sure what will!

arepas get grilled up on almost every street corner
For the uninitiated, an arepa is a humble food, just a simple, unleavened, round flatbread made from corn. Traditionally it was made using soaked corn kernels but today, pre-cooked maize flour is used (more often the instant variety). White or yellow corn is utilized, depending upon the region you are in. Arepas can be stuffed, fried, grilled, baked and boiled. The Venezuelan variety are typically split and stuffed like a sandwich. An arepa con huevo is simply a fried egg encased in corn.

grilled arepas
In Colombia they also fill them, making this sandwich-like snack more hearty. Perhaps one of the best ways to eat an arepa is fried. What food isn’t instantly made more irresistible by frying it? The arepa con huevo is no exception. This variety originated along the Caribbean coast, in the northern region of Colombia. It became so popular, you can nowadays find it in every major city in the country It’s usually served for breakfast and is perhaps the ultimate in breakfast comfort foods. Move over Cheerios, the arepa con huevo is the new breakfast of champions!

arepas stuffed like a sandwich (with a view)
So how do you make one of these tasty snacks? It’s pretty simple. Just take an arepa, crack an egg inside and slip it into the deep fryer for an unbeatable breakfast. Some places will even insert a slice of ham and cheese. I imagine bacon would be a welcome addition too. Go ahead, I won’t tell. And don’t just limit it to breakfast. These are delicious at any time of the day!
arepas con huevo!
The dough for an arepa can be prepared in two different ways. The traditional and much more labor intensive method required the kernels of maize to be soaked, peeled and later ground in a large mortar called a pilón. This left just the endosperm of the corn behind which was used to make the dough. It was known as maize pilado and it had to be boiled first then ground into a dough. Some places in Colombia still adhere to this old traditional way of making the masa and if you can find these places, be sure to sample the arepa con huevo there because the taste and texture are noticeably richer.
More often these days, you will find precooked arepa flour. Because it is already cooked, it forms into the arepa shape with ease. Areparina, is a brand readily available in Colombia and it is what most street vendors use. You simply mix the dough with water, salt and sometimes butter or milk and it’s ready to be used. In North America, you can find this dough in Latin American markets, labeled masarepa (masa for arepas). Click here for a link to the Goya brand available on Amazon.
Things You Will Need:
-1 cup masarepa (arepa dough found easily in any Latin American market) also known as harina de maiz
-a little pinch of salt and sugar-half teaspoon each
-1 cup warm water
-egg
-oil for deep frying but you don’t need an actual deep fryer. Just use a heavy bottomed wide pot
*If you are new to my site, remember I don’t like to give exact amounts. I want to teach you methods and how to cook rather than relying too heavily on a recipe. That said for things like this dough, I will give you the measurements. If you want to make a lot, increase the recipe using a 1:1 ratio. For example, one cup flour, one cup water, 2 cups flour, 2 cups water, etc.
How To Prepare:

I am not gonna lie. Arepas con huevo takes a bit of practice. The old ladies making these on the streets of Colombia will fool you into thinking that it’s as effortless as they make it look. Don’t believe it. But also don’t get discouraged. They aren’t that hard to make and with some practice you will be an old pro. Take my tips into consideration and your life will be a lot easier when trying these for the first time.
Follow the package directions for the arepa or just take 1 cup of the flour and mix it with the salt and sugar.
Add the warm water and mix gently. Tip: Let the mixture sit for at least 5 minutes.
If using the proportions above (1 cup to 1 cup) then separate the dough into four pieces. Roll into balls.
Tip: Use parchment or plastic wrap to help you flatten the balls. Parchment works best.
Take one fourth of the dough and put it in between 2 pieces of parchment. Flatten into a pancake or pita bread shape about 1/4 thick
Tip: Make sure that the dough is indeed 1/4 inch and is thick enough because you are going to be inserting an egg into it.
If you have a deep fryer, heat the oil in that according to your fryer’s directions. If you don’t have a deep fryer, no big deal. You can just use an ordinary wide pot. A heavy bottomed one works best. Fill the oil at least half but preferably a bit more. You can reuse this oil many times, so don’t fret that you are using so much. To save it, wait til it cools then store it in a jar or an old coffee can. Heat your oil in the pot. Tip: Only fry one arepa at a time-you don’t want to crowd the pot.
Once the oil is at 350 or hot enough for deep frying, add your arepa. Cook for about 1.5 minutes on each side.
Carefully take the arepa out with a slotted metal spoon and transfer to paper towels to drain extra grease.
Crack an egg into a small bowl or ramekin or even better, something like a pyrex glass measuring cup with a spout. Tip: Do NOT attempt to just crack the egg into arepa your first time! The ladies in Colombia do this with one hand but it is NOT easy! Putting the egg in a bowl first ensures a mess-free addition!
Take a small, sharp knife and slice a small slit on one side of the arepa as if you are splitting a pita. But just a SMALL slit! You want it to be big enough for the egg to be added inside but no more.
Take the egg in your bowl or measuring cup and pour into the arepa. Slide it back into the hot oil. Tip: Be sure to put the arepa back in the oil with the slit side up! I think it goes without saying but if you put it in the other way, the egg will fall out into the oil!
Fry for an additional 2-4 minutes, depending upon how you want long you want your egg cooked for.
Tip: If you want to add bacon, cheeseor ham, add it in before the egg!
To Make This Vegan:
Obviously it won’t be called arepa con huevo anymore but you can make the arepa as directed above and instead of adding an egg, saute some spinach and mushrooms together. Squeeze the water out of the mixture and add to the arepa in place of the egg. Continue as directed above. Get creative with the fillings! It’s truly limitless but you’ll want to make sure you try to get most of the water out.
To Top Your Arepa:
arepas con huevo served naked!
Normally the arepa con huevo is served naked with just some salt sprinkled on top but at almost every street stall, you’ll find some aji picante (the Colombian version of a spicy salsa). If you like a bit of heat, this is the ultimate topping. I’ve also seen it served with hogao, which is a delicious, savory cooked condiment with a base of tomatoes and onions (sometimes garlic, spices and cilantro are added too).
Grab a cup of tinto or coffee and buen provecho!

WHAT TO EAT: Sopa de Mani
WHERE TO EAT IT: In markets found in Bolivia; Cochabamba has the best
If I ask people about Bolivian cuisine, at first many seem puzzled. “You mean the chicken, rice and potatoes?” is usually the response. And fair enough, this country has its share of poultry in many forms, typically served with at least two starches and sometimes bread (ouch to all the carb watchers out there!). But the foods in Bolivia are as rich and varied as its landscape and culture. The soups and stews are a shining point for the gastronomy found here.
I feel like this is where Bolivia really excels. It’s mostly due to practical reasons, as soups and soups are a pretty economical way to eat, not to mention a good part of Bolivia is located in the chilly, high altitude, Andes mountains and thus good for keeping you warm. But it’s precisely the ‘peasant’ foods that help define a country’s cuisine. Think of Boeuf Bourguignon or Coq au Vin for France. Both of these dishes started out because they were cheap ways to feed families or use leftover ingredients. Now you can find them on the table at some of the best French restaurants around the world.
Sopa de Mani translates to peanut soup. The soup got its start in Cochabamba, Bolivia, which is often referred to as the gastronomic capital of the country due to the wealth of diverse foods found there. Today you can find this soup all throughout Bolivia. Once reserved for just special occasions, like birthdays and holidays, it’s now a staple on almuerzo (lunch) menus in many markets. Surprisingly, the soup doesn’t taste strongly of peanuts. This is because you use unroasted or raw, unsalted nuts. The flavor is subtle and the texture of the ground peanuts mixed with the ‘milk’ that the peanuts make, helps give the soup a creamy look. But even though it looks creamy, this soup is naturally dairy-free.

There are two key things that will help make this soup stand out. You must use fresh peanuts and either real, homemade beef stock (not that cubed stuff) or fresh beef. Traditionally, the peanuts were ground using a batán, a traditional stone grinder. Nowadays, you can just use a mortar & pestle, which will give you nice, authentic results or a food processor if you want to go modern style. Even though this is a meat-based soup, it can easily be made vegan and vegetarian and I will include those versions below.

the batan-traditional stone grinder
You might wonder why I always talk about gluten-free, vegetarian or vegan and even offer to give versions and categorize them on my website here. It might seem awfully trendy that I do it because even I cringe at writing those words that you see plastered everywhere these days. A few years ago, when I was living in NYC, I attended a culinary school there called The Natural Gourmet Institute. Funny enough, I was eating a vegetarian diet back then and by the time I had left the school, I started eating meat again! That’s a long story that I’ll save for another post!
The cooking school was unique because it was a health-supportive one. We learned tradtional French techniques but also explored many ways for creating delicious, healthy vegan, gluten-free and vegetarian foods. I found it all fascinating and I have several friends who follow these diets for various reasons and so I decided I would give versions here on eatingsouthamerica too. I like to think about how to covert traditional recipes into ones that even people who follow special diets can use and so the idea was born. I sincerely hope some of you who are following a special diet (vegan, gluten-free, vegetarian) will be able to find my recipes here useful (and tasty!).

learning to make sopa de mani with the locals
I got really lucky when we visited Bolivia because I had a chance to learn how to make sopa de mani from a local family. We were in the south of the country just outside of the wine growing region of Tarija and I found out about a program called EDYFU (Educacion Y Futuro). This is community based, non-profit tourism company owned by an affable Belgian guy who arranged for us to do this class with some of the local ladies. EDYFU run a shop, Eco-Sol, in downtown Tarija but also have many other social programs dedicated to bettering the lives of the local and national people. Basically, it benefits the locals because they can earn an income from tourism and it benefits tourists because it helps them get an insight into the local life. It’s a win-win. If you are planning a trip to Bolivia, check out this amazing program. You can check out some of our photos from Tarija in the photo essay I made here.
I spent the day with a local family and even got to try out using a traditional batán to grind the peanuts. Not so easy (it requires a lot of elbow grease) but I really enjoyed it. After we finished making the soup, Laurent and I sat around with the family and enjoyed the fruits of our labor. It was a lovely afternoon and so much fun to learn about making one of Bolivia’s best soups. I even got a chance to practice my pretty bad Spanish and managed to do okay (they at least understood me!). I really hope to one day be able to become more fluent and conversational (to move beyond just functional) with the language. But for now, most of the time I am just relieved to just get by!

I enjoyed this method of grinding the peanuts. Very therapeutic!
Let’s take a look at how to make this soup. The end result is creamy and rich tasting and will warm you from the inside out! Perfect for a chilly day.
Things You Will Need:

1 Cup raw unsalted peanuts (the salty snacking kind will NOT work here! Neither will peanut butter-even the natural stuff, sorry)
3/4 lb Beef shanks (or bone-in short ribs or any other meat or poultry you want to use-I recommend on the bone for more flavor)
6-8 Cups high quality stock if you are not using any meat (you want the broth to have a rich flavor. If using the meat, simply use water to cover the meat and cook the broth that way but if not using meat, you need to use a quality stock to have a nice flavor)
Diced onion (2 small, 1 large or medium size is good-doesn’t matter what color it is)
Grated carrots (about 2 will do nicely, if they are giant, just use one)
2 Potatoes (or 3 if they are very small) cut in small chunks
2 Fresh tomatoes
Minced garlic (1-2 cloves is recommended but if you are a lover, feel free to add more to suit your taste)
Cumin to taste (about 1/2 teaspoon to a full teaspoon)
Finely chopped fresh oregano and parsley (a big handful of the parsley and about 3 tbps of oregano)
Acelga (like chard) a large handful chopped or more if you like
Peas-fresh or frozen about 1/4-1/2 cup depending on your taste
Canola Oil (or other oil for frying potatoes to garnish)
*Keep in mind that this is just what is traditionally used. If you hate garlic, don’t add it. If you have some celery or bell pepper on hand, feel free to add it in.
How To Prepare Sopa de Mani
(Vegan version to follow)

soaking the peanuts in water is the first step
First, you need to soak the raw peanuts in water until they are softened a bit. Put them in a bowl and cover with water. You can soak them in as little as 30 minutes but a bit more would be helpful. Next, you must grind them; strain first and dump out the water. Traditionally, the batán was used but as I’ve already mentioned, you can use whatever you’d like. Unless you’re Bolivian, I doubt many of you have a batán anyway! A food processor will save you time but if you like to work with your hands, use the mortar and pestle if you have it.
The most important thing is that they get ground up fine to about the texture of ground peppercorns (you don’t want a powder nor big chunks). If you are using the blender or food processor, blend the soaked nuts with about a cup of fresh water-remember to pulse it-you want a few very small pieces for texture. If doing it manually, add one cup of water and stir.

although not very appetizing, this is the texture you want after grinding
Either boil the beef shanks in some salted water or use a high quality broth but first brown the meat. Remember if you use the meat, then you don’t have to use stock. You can just add water and the meat will flavor your water enough. Of course if you want an increased depth of flavor, use a fresh stock on top of the meat. I strongly suggest browning your meat a bit first for an increased flavor.
This is an important step in most stews and soups when using meat. If you skip it, you will not achieve the great depth of flavor. You can technically skip it but I advise against it. Brown the meat on all sides without crowding the pot. Use a bit of oil so it doesn’t stick.

meat on the bone will give your soup a very rich flavor and eliminate the need for stock
After the meat is browned, remove it and add the onion, grated carrot, 1 or 2 of the chopped potatoes (reserve one for the garnish), tomatoes and saute for 5-7 minutes until it’s softened. Add the chopped garlic and cumin and salt and pepper to taste. Pour in the peanut mixture with water. Peas and acelga (chard) are added at the end. Cooking the soup for at least an hour ensures that all the flavors will marry but I would cook it for at least 2.

using a blender to help pour the peanut mixture into the soup
The traditional garnish for this soup are french fries! How cool is that?! You can omit them, if you are watching your diet but I absolutely love french fries so I like this soup with them. Peel and chop the last potato into thin fry slices and fry them in the hot vegetable oil. Strain onto some paper towels and salt. Garnish your soup with the parsley, oregano and fries. Add more salt and pepper depending on your taste.

fresh herbs are best added at the end
Try This Vegan Version
Use the above ingredient list but eliminate the meat. For the stock, I would use a roasted vegetable stock which will give the soup a great depth of flavor but use whatever vegan stock you like. In addition to the above ingredients, add in 2 tbps tomato paste along with the onions. This will change the color of the soup but it will provide a richer flavor. Follow the ‘how to prepare’ above the same as you would.
The peanuts will create a thickened, creamy texture and will be deeply satisfying, especially if you miss having dairy sometimes.

WHAT TO EAT: CEVICHE/CEBICHE
WHERE TO EAT IT: PERU HAS THE BEST-ALONG THE COAST IN PLACES LIKE LIMA IS WHERE YOU WILL FIND THE FRESHEST
If ever there were a perfect celebration of just one food, ceviche would undoubtedly be it. It also happens to be naturally gluten-free and very good for you! The idea is to take one central ingredient, fresh fish, and highlight it the best way possible. The other ingredients serve to just enhance the freshness of the fish. Okay, maybe sushi does that pretty well too but today we are going to focus on ceviche or cebiche, as it’s known in Peru. Most of you have probably heard of it but do you know what it is or what makes it special?
Basically, it is very fresh fish that gets ‘cooked’ in an acid. Here in Peru the acid of choice is the almighty limón. This word translates to ‘lemon’ in Spanish but the limóns in Peru are neither lemon nor lime like you can find in any other country. It is what makes the ceviche here the best. Limóns are similar to what we know in North America as a key lime (Citrus aurantiifolia).

Peruvian limons
The flavor of the limón in Peru is unique. The species here is known as limon sutil. It’s thought to be a close relative of the citrus aurantiifolia but it’s not the same fruit. Even in Colombia, where they have a very similar limón, the taste is slightly different. The rind is thin, the flavor is more aromatic with a pleasingly round, strong acidity and no bitterness. The best way I can describe it is a key lime that is more intense and rich. I can go on and on about the limón but I’ll stop here.
The most important thing to take away from this is how integral the limón (or the acid you will use) is to a good ceviche. It’s vital, the real heart of this dish. If you have made ceviche in the past and flopped, it might be because of the kind of citrus you used. Getting Peruvian limóns outside of Peru is a big challenge but if you can get your hands on Mexican limes or key limes, I would suggest those over the larger persian limes that you normally find in North American and European supermarkets.
Peru is undoubtedly the birthplace of ceviche. It dates back over 2000 years and even the ancient Incas used to marinate the fish with chicha de jora! The dish is part of Peruvian national heritage and they’ve even bestowed a holiday declared in its honor (June 28)! You can find ceviche in Colombia, Ecuador and even parts of Central America but Peru is not only the birthplace but where they arguably do it best. Lima has well over a thousand cevicherias and many different versions to sate any palate. If you plan to visit the city, the best places to try are Chez Wong, La Mar, El Rincon Que No Conoces, La Picanteria and I love the version with just almejas (clams) at El Rincon de Bigote. You can’t really go wrong in this city.These people know what they are doing when it comes to ceviche so wherever you end up will probably be fine.

the not-to-be-missed almeja (clam) ceviche at El Rincon de Bigote in Lima
Believe it or not, many tourists choose to skip Lima because it is not the most culturally renown city in the world. A lot of tourists that I met simply shrugged when I asked them if they had enjoyed thir visit to the city. And let’s face it, Lima doesn’t have too much going for it. The climate kind of sucks, it’s grey and misty for most of the year. There are no grand sights or world class museums. But (and this is a big but!) the restaurants here are world-class. If you are a food lover, you are in for a big treat. We were blown away when we arrived in Lima in terms of quality and great value. The food is off the hook, we are talking top-notch stuff that could sit well in big cities like NYC, Paris or London for a fraction of the cost! Our first time in Lima we were so lucky because the annual food festival, Mistura, had just started. Held every year in September, this is a great place to sample some of the typical foods of Peru. Here was the first time I had a chance to taste ceviche.
El Rincon Que No Conoces had set up a stand and we marched over, first thing, to taste it. Keep in mind that typically ceviche is a lunch food. The earlier you go to eat it, the better and fresher it will be. Most cevicherias close around 5 pm in Lima. It was about noon when I stood in line with my ticket in hand, half salivating, waiting to taste my first bite of ceviche. Sweet potato, sliced red onion, a hunk of corn on the cob (the corn here is much larger and sweeter though) and some crunchy chancha (fried corn) are the classic garnishes and were served to me with my order of ceviche. The fish was plump and fresh and I could hardly wait for my first taste! I dug in for that memorable first bite. Never in my life had I ever had such good ceviche. Each bite melted in my mouth and the acidity of the limón was nicely balanced against the sweetness from the corn and sweet potato. The raw onion and fried corn provided a crunchy texture contrast next to the soft fish. It was truly amazing.

my first ceviche at Mistura
They had something else on their menu called ‘leche de tigre’ and even with my limited Spanish, this was an easy translation for me. Milk of the tiger. But what did that have to do with food? Were they really selling tiger’s milk on the menu?! I was soon to find out. We were given a cup that appeared milky and cloudy but with flecks of fish, and finely chopped pepper and onion floating in it. Not the most appetizing thing to look at so I remained skeptical. We took a sip and discovered it was the marinade from the ceviche! Oh you cannot imagine how the heavens opened up on this one. Nectar of the gods for a salt lover like myself! Even Laurent who would choose sweet over salty any day, couldn’t get enough of the leche de tigre.

getting ready to learn how to make ceviche
I learned to make ceviche when I was in Lima. I have a friend, Andres who lives there and he gave me great tips on how to make ceviche. He also gave me a few variations that he likes to do (which were equally delicious and I am going to share with you below). I feel like people don’t make enough fish dishes at home. It’s always something you order when you go out. Maybe they are worried that somehow it will get screwed up or don’t know a place to get fresh fish. Ceviche is very simple to make, as long as you follow what I say really carefully. You don’t need any pots, pans or anything to make ceviche. You never have to turn on the stove. Just a bowl and knife are all you really need. It hardly makes a mess, so if you hate washing a lot of dishes like I do, you will be happy to make this. It’s also ready within minutes, tastes delicious, is gluten-free and very healthy and even makes an impressive starter to serve to your dinner guests. Ceviche has a lot going for it, give it a try!
What You Will Need To Make Ceviche:
Ceviche needs only 5 ingredients. Anything else you end up adding is extra. Normally when a dish has so few ingredients, it’s crucial to use the highest quality you can find. You must start with fresh fish or shellfish. This is the number one key to a successful dish. Typically in Peru, ceviche is made with corvina. Other fine choices include sole, fluke or flounder and even shellfish like scallops and shrimp work well too. Octopus is another welcome addition that you see a lot of in Peru. You can technically use any fish but the most important thing is that it is fresh.

fresh fish is key
You also need a good quality salt. This is not the time to use the stuff that comes out of the pre-bought shaker or carton. Keep the Morton’s in the closet. The reason you want a nice salt is because salting your fish is the second key to an outstanding ceviche. We already talked about the limón, so get yourself some nice ones to work with, spend the extra money- if you are going to do something, do it right. The last two ingredients, very thinly sliced red onion and some fresh hot pepper, the Peruvians usually use chili peppers called rocoto or aji limo but you can substitute something else if you can’t find those. Click on the names of the peppers to find out more and use your judgement for substitutions. Just don’t use a green pepper (like jalapeno) because it will mess with the flavor. Green peppers taste, well, they just taste too green!
You can also add things like garlic or finely chopped bell pepper (yellow or orange are lovely choices). Chef Wong of Chez Wong is the only guy I ever heard of that puts black pepper on the ceviche. You can experiment here but don’t forget your 5 essentials. And keep the flavor subtle. I absolutely love garlic but I would not put it in my ceviche because I feel the taste overpowers the fish. Use sparingly. Finely chopped fresh herbs like parsley or cilantro work well too. Remember that moderation is key, you want the fish to be the star here.
How To Prepare:
As I mentioned earlier, the limón is what ‘cooks’ the fish. Not really cook in a traditional sense over fire but instead the citrus denatures the protein (unravels the protein strands) and gives the fish an opaque,almost-cooked appearance. It’s important to note that the citrus does not kill any bacteria the way proper cooking does. That’s why pregnant women should steer clear of raw fish and it’s also important for you to eat ceviche from a good source (i.e. a restaurant that believes in refrigeration or if you are preparing yourself, be sure the fish is very fresh and has been properly stored).
Take your fresh fish and cut it into about half inch or one inch chunks. Not too big but not too small. Place the fish in a non-reactive bowl (like glass) and salt your fish lightly, put it back into the fridge to keep it cold. Cold is a theme here because a ceviche should be served cold. Be careful not to oversalt. Ceviche is a balance of salt and acid and you will be adding more salt into the leche de tigre.
Meanwhile, boil a sweet potato and a shucked corn on the cob. Slice some of the red onion very, very thin for garnishing.

the Peruvian corn is much larger than the North American kind
Next comes the all important limón. For a half pound of fish, use about 1/3 cup of acid (if you can’t get the Peruvian kind, please experiement with the key limes). Tip: Don’t squeeze the limes fully to help try to avoid the bitter pith. Bitterness will ruin your ceviche! To make a good leche de tigre, blend together in a small blender or little food processor-the acid, about half of a very small red onion (less if it’s bigger) and half of an aji-be sure to remove the seeds and pith (or your substituted hot chili pepper-habanero is a good choice). Blend it with about 2 ice cubes and salt to taste (it should taste pretty salty but a nice balance with the acid) until smooth and ‘milky’. If you really like garlic or cilantro, feel free to add it to the onion and hot pepper before blending. If you don’t like the little chunks, by all means, strain it.

Pour the leche de tigre over the fish and mix the ceviche lightly with a non-metal spoon. It shouldn’t marinate more than 2 minutes. You’ll notice the fish begins to turn opaque quickly signaling it’s ready. Remove the ceviche with a slotted spoon and serve wtih a chunk of sweet potato, a slice of corn and the red onion. You can add a sprig of cilantro too, if you like it. Serve the leche de tigre in a shot glass alongside. If you want your ceviche soupy, just pour the shot in. I f you like heat, serve it with some very thinly sliced aji, rocoto or your choice of chili pepper (be sure to remove those seeds and veins!).
*You Have Got To Try This Variation*
Maybe this shouldn’t be called ‘ceviche’ but for our purposes, lets break the rules a bit. You have got to try this one! Tilapia (a tasty and sustainable fish) works well in this recipe. Take your tilapia and cut it into 1/2 inch or smaller pieces than you would for ceviche. Generously salt the fish. Mince 5 or 6 cloves of garlic, 3-4 tbsp of white vinegar (more or less depending on your taste), 1.5 tbps of dried oregano (this is one instance where dried works really nice) and add to the fish. Massage fish with this mixture. Pour in about 1/3 cup of very good extra virgin olive oil to one pound of fish, more if it looks dry. Add more salt to taste. Serve immediately.

amazing ‘ceviche’ with garlic, vinegar, oregano and oil!
Try this variation (really more of a tartar than a ceviche) with tuna. Chop the tuna into very small pieces, salt it well and add chopped tomato, onion and enough olive oil to cover the entire thing. Serve with sliced avocado on toast for a delicious lunch or perfect starter!

use a good quality fresh tuna for this

WHAT TO EAT: CHIMICHURRI
WHERE TO EAT IT: ARGENTINA AND URUGUAY
Every country has their star condiment. This is especially true while traveling around South America. Whether it was pebre in Chile or llajua in Bolivia, the table seemed to always feature one ubiquitous condiment. In Argentina and to some extent Uruguay (it’s less widespread), there is no debate about it-the king is chimichurri. Many of you have probably already heard about this sauce and can’t forget it because of that catchy name.
It was difficult to trace the history of this oddly named sauce and sources are conflicted. One version, proposed by an Argentine gourmand named Miguel Brasco, states that the sauce originated when the British were captured following the invasion of the Rio de la Plata. The British prisoners asked for something to go with their food (could you imagine prisoners being so demanding?!) and according to the story, they said ‘give me curry’ which was interpreted as ‘chimichurri’ (from che-mi-curry, a mix of Spanish, English and Aboriginal). Other theories posit that non-Argentines with last names like ‘Curry’ or ‘McCurry’ were the source.
Whatever the real story is, we should all be thankful that it’s Argentina who gave the rest of the world chimichurri. When you eat an asado (this country’s version of BBQ), you are almost always served this sauce on the side to top your steak and sausage with. Meat is never marinated in this country. A special salt (like a rock kosher salt) is typically used to rub onto the meat before it’s cooked. This salt is even labeled ‘para la parrilla’ (for the BBQ). Argentines prefer to adorn their meat after the cooking with either chimichurri or salsa criolla (more on that in another post).

meat that is just waiting for some chimchurri!
The first time I had real chimichurri (I had it in the states a few times but it definitely tastes different here) was in Buenos Aires, Argentina. We had just landed on the continent with a one way ticket from New York. It was the beginning of our journey in South America and I can remember feeling both excited and nervous. Back then, I didn’t speak any Spanish other than baño, cerveza, gracias and por favor (bathroom, beer, thanks and please). Pretty useful words (that actually can go together!) but very limited! I felt completely lost in those days and worried that I would never learn the language. Now I can get by alright but still struggle with talking in the past tense. Those first four words I learned are still the ones I use most often!
Laurent and I took a cooking class to learn how to make empanadas. It was in this class that I also learned the proper way to make a good chimichurri, which I am going to share with you. There are two ways (well, probably more but I am going to talk about two) to make the chimichurri. You’ll notice on this website that I don’t write a recipe in list form. It’ s not that I’m lazy but I feel that cooking should be a bit more flexible than what is limited to a recipe. For baking, it’s different and you have to be more exact but for a thing like chimichurri I want you to add more of what you like and less of what you don’t. Don’t be afraid to experiment!

How to Prepare:
The most important thing for making chimichurri is that it contain parsley, oregano, olive oil and vinegar. Any other additions are a cook’s choice. The two different ways I am going to talk about deal with using fresh herbs verses dried. For me, it’s a personal preference and I like to use fresh herbs. If your preference is dried, then by all means use the dried herbs. I absolutely love fresh parsley. I use it in many dishes. Parsley is a neglected herb. Sure it’s sprinkled on top of every dish in restaurants but it never gets the starring role. I feel bad for parsley it just doesn’t get the street cred it deserves. People go nuts for cilantro and basil. Tarragon even gets more props. Parsley is so much more than a garnish! Chimichurri gives parsley the chance to shine. Fresh parsley is full of nutrients-did you know it has three times the Vitamin C as oranges? Click here for more surprising information about this underrated herb.
It’s no surprise that I like to start my chimichurri with fresh parsley and oregano. When using fresh herbs, remember that you always need more than if you use dried because when you chop the fresh herbs, they reduce to a very small amount. For this recipe you will need onion, garlic, parsley, oregano, red wine vinegar and olive oil (salt and pepper too and maybe paprika or chile flakes if you want a bit of spice). You need about one large bunch of parsley minced (chopped very fine) and about 3 tbsp of oregano minced. This can be adjusted to suit your tastes.
Next chop half an onion (if it’s large or a whole small) and a few cloves of garlic, depending on your taste. I like to use 4 large cloves. Mince everything as finely as you can. If you aren’t too keen to chop everything so fine (it does take time but in my opinion, it tastes better when you hand chop it and you can also control the consistency this way) then go ahead and use a food processor. If you really like chunks, don’t mince it so much. Some finely grated carrot is also a nice addition.
Once everything is minced, add it to a bowl and mix in salt and pepper to your taste. Then add about 3 tbsp of red wine vinegar (or another kind but not balsamic). It doesn’t really matter how much you add or what kind you use. Don’t add more than a few tbsp though or it will be too acidic. The most important thing is to add the vinegar first and mix it into the herbs and aromatics. If you want to add some heat, add some chile flakes at this point or some paprika (this will alter the color and the sauce will be have a darker, red hue with a different flavor but still delicious and traditional). Feel free to add some lemon juice or zest if you really like citrus.

chimichurri made with paprika
After you mix the aromatics and herbs with the acid of your choice (vinegar, lemon or a combination) add about a half cup of olive oil. You want this sauce to be more on the thin side but if you really insist on having a chunky sauce, go ahead but it won’t be as traditional. If you want to use dried herbs, you can use those too but add much less than you would fresh. A total of 4 tbsp of dried herbs (typical is just with parsley and oregano) will suffice. Stir the sauce well after the addition of the olive oil. If using a food processor, drizzle the oil in as the machine is running. Add more if it’s too thick.
Remember the key to your chimichurri is to always have a base of parsley, oregano, vinegar and olive oil. Then add what you like. Now get that meat on the grill and spoon some chimichurri on top! In Argentina, they usually serve it with beef but it also works very nice with chicken and fish. It’s even good on bread, potatoes and roasted vegetables. I’d love to hear about your favorite way to eat chimichurri!

WHAT TO EAT: TAPIOCA
WHERE TO EAT IT: BRAZIL
I live for truly magical moments in the kitchen. Mr. Wizard’s World, Abracadabra-type stuff. Like the first time I discovered that if you slice shitake mushrooms very thin, coat them with some olive oil and salt, then roast them in the oven for a few minutes, they turn into bacon. Okay, not real bacon but something very close. I dare you to try and come back and tell me otherwise. Or the first time I deglazed a pan and watched all the browned bits automatically clean themselves (like a swiffer had just got up in there!) and transform into something so deeply flavorful, it made me almost weep. These are what I like to refer to as magical kitchen moments. I’m sure you all have your favorites too. I am so excited to tell you that I just discovered another one of these magical moments. Watch out David Copperfield, here comes tapioca!!
Tapioca! I know what you may be thinking if you are from North America. That gooey, clumpy pudding? Well, sort of. Let me briefly explain. Tapioca comes from the cassava root (known as manioc here in Brazil). This tuber (grows under the ground) is a very important food source in this country. Brazilians go nuts for this stuff! Manioc, tapioca-mention these words to a Brazilian and watch their face light up! Don’t get it confused with yucca, which could easily happen. Read about the difference between the two here. Manioc comes in many forms in this country and even the flour can be made two different ways. I will eventually get into other uses for this on my site but for now we are just going to focus on the flour, called tapioca in Brazil. Here is a photo of the more ‘instant’ kind that you can buy here in Brazil, referred to as ‘massa pronto’ (massa means earth in Portuguese but here it just refers to the flour being ‘ready’-we say instant):

So what makes this so magical? Cassava is very starchy (in fact it’s a leading source of carbohydrates in this part of the world but it does have calcium and trace nutrients) with an almost ‘wet’ texture. To get to the point of tapioca pudding, they make what are known as ‘pearls’ of tapioca, also used in bubble tea, a popular drink originating in Taiwan and consumed in parts of Asia and now found in practically every city. This article here explains the different derivatives of tapioca in a very detailed way with great photos. Here in Brazil, tapioca is consumed normally for breakfast (no, not in that pudding form!) but instead in a delicate, lovely crepe with a slight crisp texture. Oh, it’s absolutely heavenly and you simply have to find a way to try this at home!

Aside from the taste, here is what makes it so magical. It’s essentially a flour and normally if you take a flour and put it into a pan what happens? That’s right, toasted or burned flour. No magic there. But with this tapioca flour, when you put it onto a hot pan, serious wizardry happens! Within a minute or two, the flour binds (with no added fat!) and turns itself into a light pastry. Which makes it vegan, gluten-free and heavenly all at once! It’s ab-so-freaking-lutely delicious and amazing! You can fill it with whatever your heart desires from cheese, ham, fruits and jams with coconut oil for the vegans (or mushrooms and spinach!), or as we did here, with Nutella. Laurent, my boyfriend, has a serious addiction and everywhere we go, we carry a jar of Nutella with us! The options are truly endless and you can come up with a myriad of flavors.
I was recently introduced to this diabolical food moment here in Brazil. Last year, we went on an organized hike to Machu Picchu in Peru and were lucky enough to be grouped with almost all Brazilians (and a lovely couple from Spain). One of the girls in our group is from Curitiba and so when we were passing through her beautiful city, she was kind enough to invite us to stay with her and her family. I had told her about a similar thing I had tried in Colombia and she informed me that they eat in Brazil for breakfast all the time. So she whipped out the frying pan and in less than 5 minutes, I had my magical kitchen moment!
You can get this tapioca flour literally everywhere in Brazil. I am not sure about the availability of it in the states or in Europe. If any of you reading this have experience with it, I beg you to share your information with me! Since I am not currently based in the US, I am dying to find out how easy/difficult it is to get. I did find it on Amazon here. From what I have been reading, you can also get it in Latin American markets and it’s very important to use the polvilho azedo and not the polvilho doce (has a too-fine texture). The polvilho azedo is fermented and needs a bit of water added to it before you use it.
Once you have the correct flour, it is so super easy to make! Your breakfast will be ready in the same time it takes for you to microwave that boring oatmeal. To make the tapioca ‘crepe’, simply put the starch in a small bowl and sprinkle about 1-2 tbsp water over it and mix slightly with your hands. Heat a small, non-stick skillet over medium-high heat. Use a small strainer to move the starch through directly onto the hot pan, forming a circle but ensuring the starch is spread out evenly.

In less than a minute (pay close attention to it!), the starch will magically come together! Gently fold it over with a spatula and cook the other side. This is the time to add the filling-whatever you would like. Fold one side very gently over to the other, in a crepe form. And voila, you have a pretty white crepe that looks like it was sprinkled with snow.
It’s vegan, gluten-free (depending upon your fillings) and just utterly amazing as a breakfast, snack or hell, even a dessert!!

If you have any questions at all, please ask me! I am always willing to help. And let me know if any of you have purchased this kind of flour before or if you do actually try this recipe out! I know getting the flour seems like a bit of a pain but once you have it, these are so easy to make, you will be thankful. It’s worth the effort to get it! And if you are a vegan or gluten-free, it is an absolute must!

WHAT TO DRINK: Chicha de Jora (not to be confused with the non-fermented, sweet, purple-corn drink Chica Morado)
WHERE TO DRINK IT: In the Peruvian Andes; especially in and around the Sacred Valley
*Note: There are many countries within Central and South America that make different versions of Chicha but here I will just talk about the Peruvian wayCorn lovers rejoice! Beer lovers too! Did you know you can make beer from corn? Well, you most certainly can and if you are planning to be in Peru anytime in the future, you can’t miss trying this ancient, classic beverage. Chicha de Jora is a drink that dates back to the time of the Inca Empire. Traditionally and even today, only women are supposed to make chicha, otherwise you risk offending the corn god Mama Sara. And lord knows we wouldn’t want to go offending any corn gods!
Back in these times, the chicha was made and drank in large quantities for ritual purposes. Chicha is made from germinated, sprouted corn which gets boiled and is left to ferment leaving behind a cloudy, beige beverage with a slight effervescence, similar to Kombucha. This is because the bacteria is still fermenting in your glass as you drink it.

Peru is steeped in ancient culture and traditions that are still alive to this day. In the Andes mountains, especially in and around the Sacred Valley in Peru, you can still find chicha being sold in the small, rural villages at what is known as a chicheria. In ancient times, the custom was to hang red flowers around a long stick, which would protrude from the house where the chicha was made.
Today, this tradition has changed slightly and now you have to look for a red bag, squashed into a roundish shape and attached to the protruding stick. These places are usually just villagers homes and you are more than welcome to enter and ask for a glass or two of chicha. Traditionally it will be served from a halved gourd, as pictured above but sometimes they serve it in giant glasses too.

I remember my first time trying Chicha de Jora. Laurent and I were hiking around the Sacred Valley and I had heard that if you see a house with a bright red bag attached to a stick, you could find chicha there. We stumbled upon one in the small village of Yucay located in the province of Urubamba. Being in the hot, dry Andes, we had worked up quite a thirst and so we figured why not? We entered the home of an elderly woman who was more than happy to oblige our request to try some of her chicha.

We were presented with a cloudy, grey/brown beverage with a heady foam, which was unchilled and smelled quite sour. Not exactly the refreshing drink two hikers are dreaming of! But we gave it a shot anyway. When the farmers who work these fields receive this beverage, they always pour the first little bit out onto the earth for Pachamama (the mother earth), as a sign of respect and to give mother earth the first taste. We poured our first sip out too, honoring this tradition. Then came our turn. The taste was indeed a bit sour (like the smell) and also slightly sweet from the corn. It’s got an earthy flavor which I liked a lot and due to the low alcohol content (usually only 1-3%), you can drink quite a bit. It wasn’t lemonade but it was surprisingly refreshing in the heat of the day.
The process to make Chicha de Jora is very similar to beer and if you are interested in fermenting things or making homemade beer, then you can make it right in your own home with a little time and patience. The whole process will take about two weeks. First you have to soak the raw, dried corn kernels for about 2 days to allow them to be ready for sprouting. Back in the Andes, they use banana leaves to lay out the corn. If you don’t have these, you can simply use a bucket but be sure to allow for space to let the kernels get some air. It will take about 3 or 4 days for the corn to germinate (it will grow a little sprout). This sprout should be twice the length of the kernel when it’s ready.

Did you know? In ancient times (and still done today in some places) the chicha maker used to germinate the corn directly in their mouth. Corn would be ground up and moistened with the maker’s saliva. The enzyme naturally present in the mouth would convert it into maltose. Now don’t go getting grossed out. This process has been in place in pre-modern times around the world, including in the making of sake in Japan. And since the mixture gets boiled after, there was no worry about sharing germs.
The next step is to dry it out. Outside is best and 2 sunny/dry days is needed. After the germinated corn is dried, it’s ready to begin fermentation. You will need what is called a starter. This part is where it gets a tad complicated and is best for people who have had experienced in fermenting. The goal is to end up with a mixture of Lactobacillus plantarum, and regular ale yeast.
Next you have to ground up the germinated corn into a flour and boil it. In the traditional way it just gets boiled for a few days, then cooled and strained. The strained mixture is covered and left to ferment up to 2 days or much more, depending upon how strong you want your chicha to be. If you use the starter, it will produce a properly fermented product but you should click here for a very detailed recipe, if you are serious about making this at home.
Salut!

WHAT TO EAT: SOPAIPILLA
WHERE TO EAT IT: EVERYWHERE IN CHILE; OUTSIDE OF BUS STATIONS OFTEN HAVE SOME OF THE BEST
One of the things I love most about tasting different foods in other countries is trying the street food. Who doesn’t love some good street food? Just look at the boom of food trucks all over the world. They stemmed from simple kiosks with vendors selling small, portable, tasty morsels. They are the heart and soul of a country’s foods. A small essence of what lies at the core. What’s not to like about shiny carts tempting you with the mouth-watering smells wafting through the streets? The good ones always have a group of people crowded around digging into something wrapped up in a napkin like a little secret present. You wonder what it is they are eating? Sure smells good. Let’s go see.
In every country that I visited in South America, I was fortunate enough to try some street food. One of my favorites was in Chile. No matter what part of the country you are in, from the deep south all the way up north (Chile is really long!), you are likely to see vendors forming these fresh discs of dough and then tossing them into a deep fryer. This is especially true in the winter months when the temperature often drops to freezing in some parts of the country. What’s better than a deep-fried round of goodness to comfort you through cold weather?
This snack is called sopaipilla and is made from flour but with the addition of the Chilean zapallo. In any market in the country, you can see these gigantic (I’m talking like Charlie Brown and the Great Pumpkin big!) bright orange pumpkins for sale. The vendor will usually hack off a big slab for you with his machete-type knife, so you can take a small piece home. It’s this pumpkin that gives the sopaipilla its orangey hue and subtle sweetness. You could feel slightly less guilty knowing that you are consuming a vegetable. After all, don’t deep fried veggies count?!

I remember the first time I tried this tasty treat. We had just crossed the border from Argentina into Patagonian Chile. You can read about how that came to be here. Yes, we actually walked across the border, all 23 km of it! From there, we had to take a boat to get to a tiny town called Villa O Higgins. This village marks the start of a road called the Carretera Austral. It’s an unpaved, pot-hole filled, scenic route which spans over 1200 km north all the way up to Puerto Montt, Chile. It’s got some of the most amazing scenery that you will find in all of the Patagonia region, complete with gushing waterfalls, glacier-topped mountains and lush greenery.
We came to the realization that the only way to go north was by hitchhiking as there was no space on the limited amount of buses. We started uncertain and hesitant but it turned out to be one of our greatest adventures. One of the small towns we stopped in, Cochrane, had a rodeo going on when we passed through. Here, you could find all sorts of Chilean Patagonian specialties like spit-fired lamb and it was at this rodeo where we tasted our first sopaipilla, the one you see pictured above.
Often the sopaipilla is topped with the national condiment, pebre. Pebre is a salsa found in every restaurant across the country. Made from a base of tomatoes, onions and cilantro, it’s served with pretty much anything you like. When you grab one of these ubiquitous snacks from your vendor, he or she will likely have some pebre sitting there just waiting to crown your sopaipilla.
You can also find the sopaipilla served in a sweet style. These are referred to as sopaipilla pasadas. After they are fried, they are drenched in a syrup made from unrefined sugar, orange peel, cinnamon and sometimes clove. This syrup, known as chancaca allows the sopaipilla to be eaten more as a dessert snack.
Would you like to try this snack but aren’t going to be in Chile anytime soon? It’s easy to make. First, take some pumpkin (1 small or half a large butternut squash would work too) and boil it (don’t forget to season the water with a little salt). Drain but reserve the water used for cooking, let the squash cool and mash it a bit. Add about 2 teaspoons of baking powder, 1.5 teaspoon salt to 3 cups of AP (all purpose) flour and mix. Melt 4 tablespoons of butter. Add the mashed squash into the flour mixture and knead it by hand. It will be dry at first but as the pumpkin gets absorbed it will gradually get more tacky. Add the melted butter and continue to knead.
If the dough is still too dry, add some of the reserved cooking water, a little at a time until you get a nice, smooth consistency for the dough. Form into a ball and cover the dough with a dishtowel and let it rest for about an hour. After resting, form the dough into discs either by hand or with a rolling pin. Pierce with a fork and drop the rounds one at a time into hot frying oil. Fry for about 2-3 minutes each side then drain on paper towel.
As they say in Chile: Buen Provecho! (the Spanish version of Bon Appetit)


